Friday, 8 September 2017

Use Typescript for SharePoint 2013 Apps Development

Introduction

This article shows how to use Typescript in SharePoint 2013 while creating SharePoint Hosted app using Visual Studio 2015/2013. 

Prerequisite:

  • Learn Typescript. To know more about TypeScript - Click Here 
  • Create a SharePoint Hosted App project in Visual Studio. I have given project name as "TypeScriptApp


Let's Start

Let's complete this task in following steps:-   

  • Right click on Project name "TypeScriptApp". Select "Unload project" option.


  • Edit project file(TypescriptApp.csproj).


  • Mention following MSBuild properties in project file(TypeScriptApp.csproj) as shown below:


  <PropertyGroup Condition="'$(Configuration)' == 'Debug'">  
   <TypeScriptRemoveComments>false</TypeScriptRemoveComments>  
   <TypeScriptSourceMap>true</TypeScriptSourceMap>  
  </PropertyGroup>  
  <PropertyGroup Condition="'$(Configuration)' == 'Release'">  
   <TypeScriptRemoveComments>true</TypeScriptRemoveComments>  
   <TypeScriptSourceMap>false</TypeScriptSourceMap>  
  </PropertyGroup>  
  <Import Project="$(MSBuildExtensionsPath32)\Microsoft\VisualStudio\v$(VisualStudioVersion)\TypeScript\Microsoft.TypeScript.targets" Condition="Exists('$(MSBuildExtensionsPath32)\Microsoft\VisualStudio\v$(VisualStudioVersion)\TypeScript\Microsoft.TypeScript.targets')" />  


  • For more details on MSBuild properties and Compiler Options -  Click Here
  • Close the .csproj file. Right click on Project name. Select "Reload project" option.

  •  Right click on project Name and check properties of it. You will get to see TypeScript Build option with following configuration.


  • Create html table in Default.aspx to bind SharePoint "Sales" List data using Typescript and JSOM.

  • Install following typings from Nuget package Manager :-
    • jquery.TypeScript.DefinitelyTyped
    • sharepoint.TypeScript.DefinitelyTyped
    • microsoft-ajax.TypeScript.DefinitelyTyped

  • Set the Deployment Type property of all the typescript file as "No Deployment".
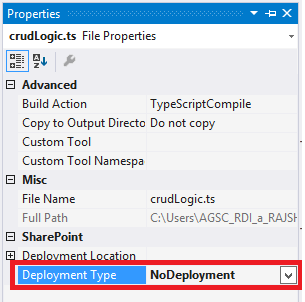
                                   

  • Add a new TypeScript File.I have created in script folder named it as "crudLogic.ts".
  • Set the Deployment Type property of "crudLogic.ts" file as "No Deployment".
  • Drag and Drop reference of  "SharePoint.d.ts" and "jquery.d.ts" on crudlogic.ts file.
  • Create a Class, name it as BasicOperations in crudlogic.ts file. Mention following properties:-
 class BasicOperations {  
   //Define properties with respect BasicOperations Class  
    _currentContext: SP.ClientContext;  
    _hostContext: SP.AppContextSite;  
    _web: SP.Web;  
    _colList: SP.ListCollection;  
    _list: SP.List;  
    _listItems: SP.ListItemCollection;  
    query: SP.CamlQuery;  
   constructor() {  
     let hostweburl = decodeURIComponent(this.getQueryStringParameter("SPHostUrl"));  
     this._currentContext = SP.ClientContext.get_current();  
     this._hostContext = new SP.AppContextSite(this._currentContext, hostweburl);  
     let appweburl = decodeURIComponent(this.getQueryStringParameter("SPAppWebUrl"));  
     this._web = this._hostContext.get_web();  
   }  
 }  

  • In the constructor of class get the Query String parameter value of SPHostUrl and SPAppWebUrl.

 private getQueryStringParameter(urlParameterKey: string) {  
     var params = document.URL.split('?')[1].split('&');  
     var strParams = '';  
     for (var i = 0; i < params.length; i = i + 1) {  
       var singleParam = params[i].split('=');  
       if (singleParam[0] == urlParameterKey)  
         return decodeURIComponent(singleParam[1]);  
     }  
   }  

  • Create a interface ICrudOperation. Define a method GetAllItems. This interface will be implemented in BasicOperations Class

 interface ICrudOperation {  
   GetAllItems(): void;  
 }  

  • Create a Logger interface. Define a method logError. This interface will be implemented in BasicOperations Class.
 interface ILogger {  
   logError(sender: any, e: SP.ClientRequestFailedEventArgs): void;  
 }  

  • Implement both interface ICrudOperation and Ilogger in BasicOperations class using "implement' keyword.
 class BasicOperations implements ICrudOperation, ILogger {  
 }  
  • Implement  GetAllItems and LogError method in BasicOperations class using JSOM.
  GetAllItems(): void {  
     this._list = this._web.get_lists().getByTitle("Sales");  
     this.query = new SP.CamlQuery();  
     this.query.set_viewXml('<View><RowLimit></RowLimit>12</View>');  
     this._listItems = this._list.getItems(this.query);  
     this._currentContext.load(this._list);  
     this._currentContext.load(this._listItems);  
     this._currentContext.executeQueryAsync(() => this.OnSuccess(), (sender: any, args: SP.ClientRequestFailedEventArgs) => this.logError(this, args));  
   }  
   private OnSuccess() {  
     var listItemEnumerator = this._listItems.getEnumerator();  
     while (listItemEnumerator.moveNext()) {  
       var currentItem = listItemEnumerator.get_current();  
       $(".SalesTable").append("<tr>"+"<td>"+"<b>" + currentItem.get_item('Month') + "</b>"+"</td>"+"<td>"+"<b>" + currentItem.get_item('Totalsales') + "</b>"+"</td>"+"</tr>");        
     }  
   }  
   logError(sender, args) {  
     $(".message").html("Request Failed: " + args.get_message());  
   }  

  • Use ExecuteOrDelayUntilScriptLoaded  method to call a pageLoad function after sp.js loads in  the browser
  • In the pageLoad function create a instance of BasicOperations Class and call GetAlItems() function. 
 'use strict';  
 ExecuteOrDelayUntilScriptLoaded(pageload, "sp.js");  
 function pageload() {  
   let foo: BasicOperations = new BasicOperations();  
   foo.GetAllItems();  
 }  
  •  Save 'crudLogic.ts' file.  Click on show all files icon from Solution Explorer. Transcript compiler will create crudLogic.js' (javaScript) and 'crudLogic.js.map' file in script folder. Include crudLogic.js in the project.


  • Set the Deployment Type property of crudLogic.js file to ElementFile.
  • Remove all the typescript file from the Elements.xml file(present in Scripts folder) and make sure crudLogic.js file is included in Script Module.


  • Include script link for crudLogic.js in Default.aspx  page.

  • Deploy SharePoint Hosted app. You will get to see expected result on "Default.aspx" page


  • It's Done. Hurray!!! 


Tuesday, 20 June 2017

Sync Outlook with Sharepoint Calendar List


Introduction

This article shows how to connect your Outlook with SharePoint Calendar List.

Prerequisite:

Outlook should be configured in your system.

Let's Start

Let's complete this task in following steps:-     

  •   Navigate to your SharePoint Calendar List you want to Connect it to Outlook.
  •   In CALENDAR tab select "Connect to Outlook"


  • A popup will open Select "Open URL:Outlook....." button.


  • Microsoft Outlook Popup will open to configure Calendar.


  • Click on "Advanced" button.
  • Provide description and select appropriate checkbox as required. 


  • You will able to view SharePoint Calendar events in Outlook calendar. 

  • Done!!!


Monday, 27 February 2017

CRUD Operation in SharePoint 2013/2010 using

  Angular Js

Introduction

This article is about CRUD Operation in SharePoint 2013/2010 using Angular Js.

Let's Start

Let's complete this task in following steps:-

  • Create a simple web part page. I have created the same, in my Online SharePoint Site named it as EmpSysDetails.aspx.
  • Create a custom list with the columns, which will store values of user input. 
  • Create an AngularJs folder in Site Assets library. Upload Angular.js file. You can download it from following site https://angularjs.org/ .
  • Mention uploaded js script link in html markup file or you can use CDN link.
     <script src="https://ajax.googleapis.com/ajax/libs/angularjs/1.6.1/angular.js"></script>  
  • Create  html mark-up with ng-app and  ng-controller directive.
     <div ng-app="myApp" ng-controller="myCtrl">  
  • Create  a Table using ng-repeat directive.

  •  <table class="table" style="margin-left:10px;">  
               <tr>  
                 <th>  
                   Employee Name  
                 </th>  
                 <th>  
                   Employee Dept  
                 </th>  
                 <th>  
                   Desk No  
                 </th>  
                 <th>  
                   System Alloted  
                 </th>  
                 <th>Edit</th>  
                 <th>Delete</th>  
               </tr>  
               <tr ng-repeat="x in employees">  
                 <td>{{x.EmpName}}</td>  
                 <td>{{x.EmpDept}}</td>  
                 <td>{{x.EmpDeskNo}}</td>  
                 <td ng-if="x.SysAllocated">Yes</td>  
                 <td ng-if="! x.SysAllocated">No</td>  
                 <td><img ng-click="EditItem(x.ID)" ng-src="../SiteAssets/AngularJs/Images/edit.png" width="50px" height="50px" alt="Edit"></img></td>  
                 <td><img ng-click="DeleteItem(x.ID)" ng-src="../SiteAssets/AngularJs/Images/delete-512.png" width="50px" height="50px" alt="Delete"></img></td>  
               </tr>  
             </table>  
  • Create Form Elements,for instance text box and checkbox using ng-model directive.
      <div class="container">  
               <div class="row">  
                 <div class="col-md-8 setrow">  
                   <span class="col-md-4">Title</span> <input class="form-control" type="text" ng-model="title" placeholder="Title" />  
                 </div>  
               </div>  
               <div class="row">  
                 <div class="col-md-8 setrow">  
                   <span class="col-md-4">Employee Name</span> <input type="text" class="form-control" ng-model="EmpName" placeholder="Enter Employee Full Name" />  
                 </div>  
               </div>  
       </div>  
    

  • Include appropriate CSS using Bootstarp.css  and custom css.
  • Create two separate JavaScript File, name it as appscript.js and sharepointfactory.js. 
  • appScript.js file contains angular app module and controller code.
  • In Controller code inject "$scope" object and "SharePointFactory" service (Name of angular factory).
     var app = angular.module("myApp",[]);  
        app.controller("myCtrl",function($scope,SharePointFactory){  
     });  
  • sharepointfactory.js file contains REST API call to do CRUD operation.
  • In the mentioned angular factory inject $http and $q service.
     app.factory('SharePointFactory', ['$http','$q', function($http,$q) { }]);  

  • Upload these two files in Site Assets library's AngulaJs folder. Mention script link in the html markup file.
      <script src="../SiteAssets/AngularJs/appscript.js"></script>   
      <script src="../SiteAssets/AngularJs/sharepointfactory.js"></script>    
  • Edit the EmpSysDetails.aspx. page and add a Script editor webpart. 
  • Click on Edit Snippet.Copy and paste all the html markup including script link  into the editor window.
  • Click on Save button present in top bar, ribbon.
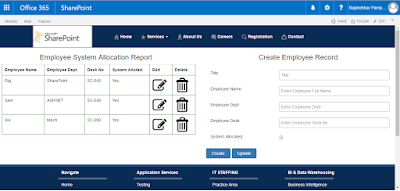
          EmpSysDetails.aspx looks like as shown below:-


Demystifying sharepointfactory.js file. 

 Let's dive into REST call to do CRUD operation.All the REST call has been done using $http and
$q service in angular factory written in  sharepointfactory.js file.

  * Fetch list items from SharePoint list i.e EmployeeList

  var getData = function() {  
     return $http.get(_spPageContextInfo.siteAbsoluteUrl+"/Proctor/_api/Web/Lists/GetByTitle('EmployeeList')/items?select=ID,Title,EmpName,EmpDept,EmpDeskNo,SysAllocated")  
     .then(function(response) {       
      return response.data.value;  
     });  
   }  

   * Create a list item in EmployeeList

 var crtItem = function(data) {  
       var deferred = $q.defer();  
       $http({  
     url: _spPageContextInfo.siteAbsoluteUrl+"/Proctor/_api/Web/Lists/GetByTitle('EmployeeList')/items",  
     method: "POST",  
     headers: {  
       "accept": "application/json;odata=verbose",  
       "X-RequestDigest": $("#__REQUESTDIGEST").val(),  
       "content-Type": "application/json;odata=verbose"  
     },  
     data: JSON.stringify(data)  
        }).then(function success(response){  
            deferred.resolve(response);  
           },  
           function error(result,status){  
            deferred.reject(status);  
           });  
         return deferred.promise;  
      }  

 * Fetch specific list item from EmployeeList by Id

      var edtItem = function(Id)  
      {  
     return $http.get(_spPageContextInfo.siteAbsoluteUrl+"/Proctor/_api/Web/Lists/GetByTitle('EmployeeList')/GetItemById(" + Id + ")")  
     .then(function(response) {       
      return response.data;  
     });  
      }  

* Update specific list item

  var updtitem = function(data){  
   console.log(data.ID);  
    var deferred = $q.defer();  
    $http({  
     url: _spPageContextInfo.siteAbsoluteUrl+"/proctor/_api/web/lists/getbytitle('employeelist')/getitembyid(" + data.ID + ")",  
     method: "PATCH",  
     headers: {  
       "accept": "application/json;odata=verbose",  
       "X-RequestDigest": $("#__REQUESTDIGEST").val(),  
       "content-type": "application/json;odata=verbose",  
              "X-HTTP-Method": "PATCH",  
              'IF-MATCH': '*'  
     },  
     data: JSON.stringify(data)  
     }).then(function success(response){  
         deferred.resolve(response);  
        },  
        function error(result,status){  
         deferred.reject(status);  
        });  
      return deferred.promise;  
   }  

* Delete specific list item by Id

 var dltItem = function(Id)  
      {  
           var deferred = $q.defer();  
       $http({  
     url: _spPageContextInfo.siteAbsoluteUrl+"/Proctor/_api/Web/Lists/GetByTitle('EmployeeList')/items(" + Id + ")",  
     method: "DELETE",  
     headers: {  
        "accept": "application/json;odata=verbose",  
       "X-RequestDigest": $("#__REQUESTDIGEST").val(),  
                 'IF-MATCH': '*'  
     },  
        }).then(function success(response){  
            deferred.resolve(response);  
           },  
           function error(result,status){  
            deferred.reject(status);  
           });  
         return deferred.promise;  
      }  

*Mention return object in angular factory.

 return {  
           getData: getData ,  
           crtItem : crtItem,  
           edtItem : edtItem,  
           dltItem :dltItem,  
           updtitem:updtitem  
   };  

Demystifying appScript.js file. 


  1. $scope.employees declared as an array object. getData() method from "SharepointFactory" service to fetch list item and update array object. It will create table row with content in it.
var app = angular.module("myApp",[]);
     app.controller("myCtrl",function($scope,SharePointFactory){
       $scope.employees = [];  
       // Get all the items from the SharePoint List  
       SharePointFactory.getData().then(function(emp){  
            angular.forEach(emp,function(item,index){  
        $scope.employees.push(item);              
            });       
       });  

       2. The event.preventDefault() method stops the default action of an element from happening. For example: Prevent a submit button from submitting a form. 

$scope.createItem() event trigger on click of Create Button. It creates an item in list.and updates array object.The powerful feature of angular js - Two-way binding, creates a new row and content in the table. 

       // Create an Item in SharePoint List  
      $scope.createItem = function(event){       
      event.preventDefault();  
      var data = {  
        __metadata: { 'type': 'SP.Data.EmployeeListListItem' },  
        Title:$scope.title,  
        EmpName:$scope.EmpName,  
        EmpDept:$scope.EmpDept,  
        EmpDeskNo:$scope.EmpDesk,  
        SysAllocated:$scope.SysAllocated  
        };  
      SharePointFactory.crtItem(data).then(function (response) {  
       $scope.employees.push(response.data.d);  
       $scope.title = "";  
       $scope.EmpName = "";  
       $scope.EmpDesk= "";  
       $scope.EmpDept= "";  
       $scope.SysAllocated = false;  
       });  
      };  


         3. $scope.EditItem() event trigger on click of Edit Icon in the Table.It will fill Create Employee Record Form with a row data to be edited. 


      // Edit an Item in SharePoint List 
      $scope.EditItem = function(ID){       
           SharePointFactory.edtItem(ID).then(function(emp){  
       $scope.title = emp.Title;  
 $scope.EmpName = emp.EmpName;  
 $scope.EmpDept = emp.EmpDept;  
 $scope.EmpDesk = emp.EmpDeskNo;  
 $scope.SysAllocated = emp.SysAllocated;            
 $scope.ID = emp.ID;       
           });  
      }; 

        4. $scope.updateItem() event trigger on click of Update button. It will update the edited item and the splice() method adds/removes items to/from an array. It will update the UI with updated content in table row. 


// Update an item in Sharepoint List 
      $scope.updateItem = function(event){       
      event.preventDefault();  
      var data = {  
        __metadata: { 'type': 'SP.Data.EmployeeListListItem' },  
        Title:$scope.title,  
        EmpName:$scope.EmpName,  
        EmpDept:$scope.EmpDept,  
        EmpDeskNo:$scope.EmpDesk,  
        SysAllocated:$scope.SysAllocated,  
        ID:$scope.ID  
       };  
      SharePointFactory.updtitem(data).then(function (response) {  
       angular.forEach($scope.employees,function(item,index){  
     if(item.ID == data.ID){  
       $scope.employees.splice(index,1,data);  
       $scope.title = "";  
       $scope.EmpName = "";  
       $scope.EmpDesk= "";  
       $scope.EmpDept= "";  
       $scope.SysAllocated = false;  
       }  
       });  
   });  
  };  

        5. $scope.DeleteItem() event trigger on click of Delete Icon in the Table. It will delete the list item and remove that item from the array object.It will remove the row from the table.

         // Delete an Item in SharePoint List
           $scope.DeleteItem = function(ID){  
           SharePointFactory.dltItem(ID).then(function(emp){  
           $scope.removeItem($scope.employees,ID);  
           });  
           };  
           $scope.removeItem = function(array, ID){  
                console.log("remove item");  
   angular.forEach(array,function(item,index){  
     if(item.ID == ID){  
       $scope.employees.splice(index,1);  
       $scope.title = "";  
       $scope.EmpName = "";  
       $scope.EmpDesk= "";  
       $scope.EmpDept= "";  
       $scope.SysAllocated = false;  
       }  
   });  
 };       


Conclusion

    This article not only includes how to use Angular Js with Sharepoint 2013 but also elaborate on REST api and manipulating array objects which results in enhanced user experience.

Thursday, 13 October 2016

Add Attachment to a List Item using REST api in

SharePoint 2010/2013

Introduction

This article is about how to use REST api to attach file to a list item in SharePoint 2010/2013.

Let's Start

Create a JavaScript function named addFile . Pass ListName and ItemId  as a parameter to addFile function as show below:-

 function addFile(listName,itemId){  
      var allFiles = [];  
      var input = document.getElementById('file');  
      var file = input.files[0];  
      if (file != null && file.size > 0) {  
                          allFiles.push(file);  
      }  
      if (allFiles.length > 0) {                             
                          uploadFile(listName, itemId, allFiles);  
      }  
      else {  
           alert("Please select the Attachment");  
      }          
 }  

UploadFile function is going to attach file to a list item using REST api as show below:-

 function uploadFile(listName, id, file) {  
    var deferred = $.Deferred();  
    var fileName = file.name;  
    getFileBuffer(file).then(  
    function (buffer) {  
     var bytes = new Uint8Array(buffer);  
     var binary = '';  
     for (var b = 0; b < bytes.length; b++) {  
     binary += String.fromCharCode(bytes[b]);  
     }  
     var scriptbase = _spPageContextInfo.webServerRelativeUrl + "/_layouts/15/";  
     console.log(' File size:' + bytes.length);  
     $.getScript(scriptbase + "SP.RequestExecutor.js", function () {  
     var createitem = new SP.RequestExecutor(_spPageContextInfo.webServerRelativeUrl);  
     createitem.executeAsync({  
      url: _spPageContextInfo.webServerRelativeUrl + "/_api/web/lists/GetByTitle('" + listName + "')/items(" + id + ")/AttachmentFiles/add(FileName='" + fileName + "')",  
      method: "POST",  
      binaryStringRequestBody: true,  
      body: binary,  
      success: fsucc,  
      error: ferr,  
      state: "Update"  
     });  
     function fsucc(data) {  
      console.log(data + ' uploaded successfully');  
      deferred.resolve(data);  
     }  
     function ferr(data) {  
      console.log(fileName + "not uploaded error");  
      deferred.reject(data);  
     }  
     });  
    },  
    function (err) {  
     deferred.reject(err);  
    }  
    );  
    return deferred.promise();  
   }  

  Convert file to stream of bytes using FileReader() Object .

 function getFileBuffer(file) {   
            var deferred = $.Deferred();   
            var reader = new FileReader();   
            reader.onload = function (e) {   
              deferred.resolve(e.target.result);   
            }   
            reader.onerror = function (e) {   
              deferred.reject(e.target.error);   
            }   
            reader.readAsArrayBuffer(file);   
            return deferred.promise();   
         }   

Monday, 19 September 2016

"Working on it..." Custom Dialog Box in SharePoint

 using Javascript/Jquery(JSOM)

Introduction

This article is about creating "Working on it" Custom Dialog Box  in SharePoint.

Let's Start


Define a global Variable 'waitDialog'.

 var waitDialog = null;  

   While calling a Save function using Rest API or any long Operation function, Call RequestStarted() function at the starting and just before the end of the Save function,  Call  RequestEnded() function.


 function RequestStarted() {  
   ExecuteOrDelayUntilScriptLoaded(ShowWaitScreen, "sp.js");  
   };  
  function RequestEnded() {  
   try {  
    waitDialog.close();  
    waitDialog = null;  
   } catch (ex) { }  
   };  
   function ShowWaitScreen() {  
   try {  
    if (waitDialog == null) {  
    //waitDialog = SP.UI.ModalDialog.showWaitScreenWithNoClose('Processing...', 'Please wait while request is in progress.', 100, 380);  
    waitDialog = SP.UI.ModalDialog.showWaitScreenWithNoClose(SP.Res.dialogLoading15);  
    }  
   } catch (ex) { }  
   }  


   Instead of "Working on it..." Dialog box ,For custom dialog box use following code:-

  waitDialog = SP.UI.ModalDialog.showWaitScreenWithNoClose('Processing...', 'Please wait while request is in progress.', 100, 380);